Guide to Editing Sound in Adobe Audition
Most viewers only consciously register 20% of what they’re hearing in a film. The rest — room tone, subtle music swells, a door that creaks — is doing emotional work under the radar. Sound editing is storytelling, not just “cleaning up levels or fixing the audio.”
Listening vs. Hearing
Editors are emotional engineers — every choice (silence, swell, rumble) is a decision.
Why Audition?
Built for both repair (removing noise/hums) and multitrack mixing — unlike Adobe Premiere, whose priority is video-first though they do have great generative Ai sound effects features.
PC + Mac Keyboard Shortcuts Differ
PC Mac
| Modifier key | Ctrl | Cmd |
| Preferences location | Edit > Preferences | Audition > Preferences |
| Copy/Paste | Ctrl+C / Ctrl+V | Cmd+C / Cmd+V |
| Zoom | Ctrl+scroll or =/- | Cmd+scroll or =/- |
| File paths | Backslash, drive letters | Forward slash, no drive letters —
matters when relinking missing media |
Folder Structure + Media Organization
Here is a folder structure for your portable drive that can be used as a template for future projects:

The PROJECT FILES folder is where created Audition sessions + audio files to edit will live.
The NOTES folder will have interview + story transcripts, and other documents.
The EXPORTED AUDIO folder will house finished edited sessions.
When working on a new assignment, duplicate the main ‘FILE STRUCTURE’ folder + relabel to a new story name. And your original audio files should then be stored in the 01 PROJECT FILES subfolder. Remember: **Audition auto-references files by file path, so if media moves or gets renamed, the session breaks. Consistent folders = no “missing file” panic later.
Audition’s Interface
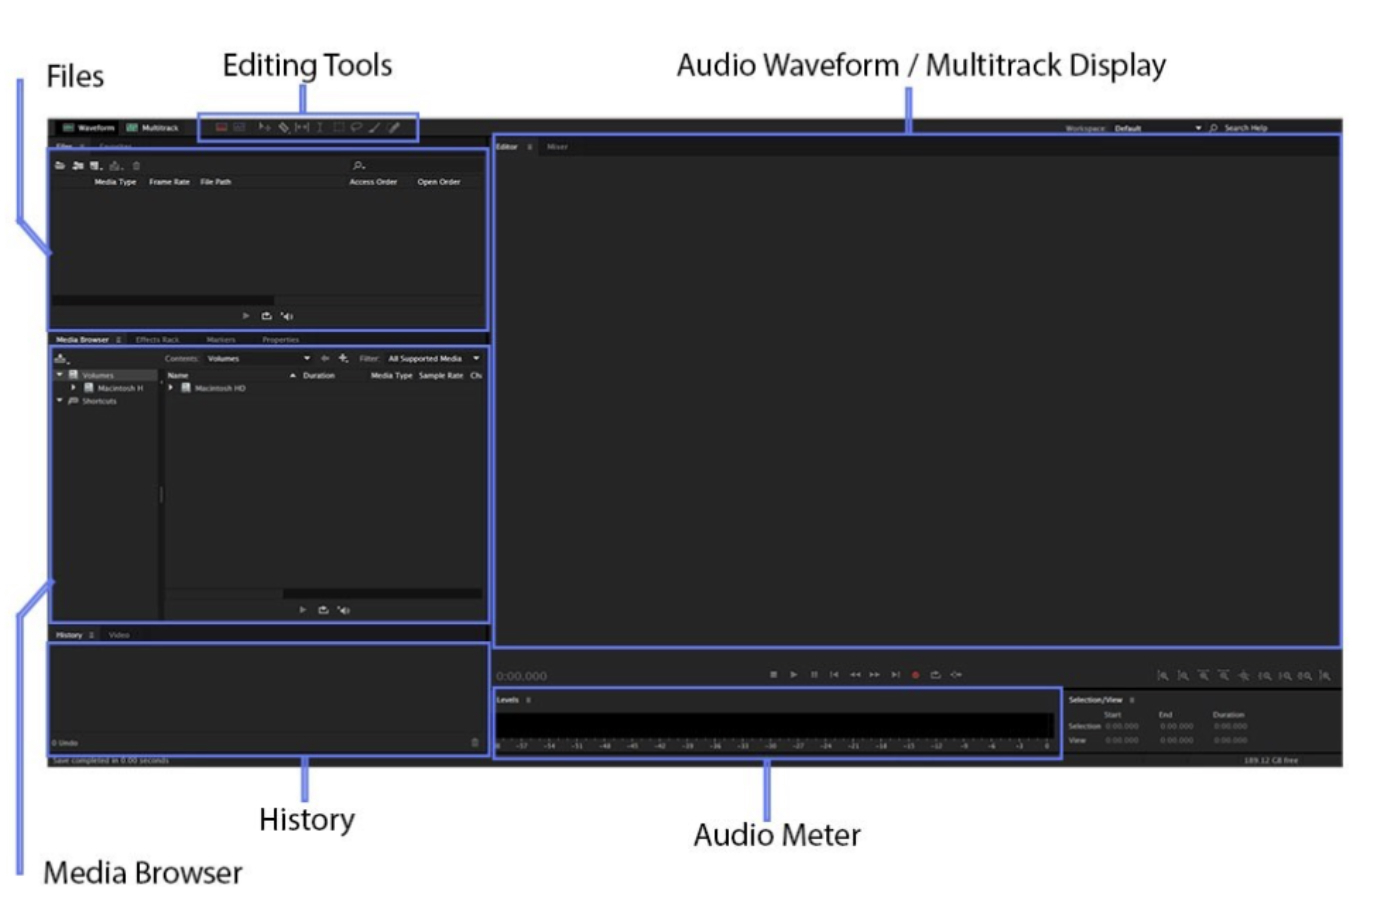
Waveform vs. Multitrack Views / Editors
- Audition offers TWO editing environments:
- Waveform view is for surgical editing + cleanup of a single audio file.
- Double-click the FILES panel (or File > Import) to import audio clips to edit individually in Waveform editor to then pull over to Multitrack editor.
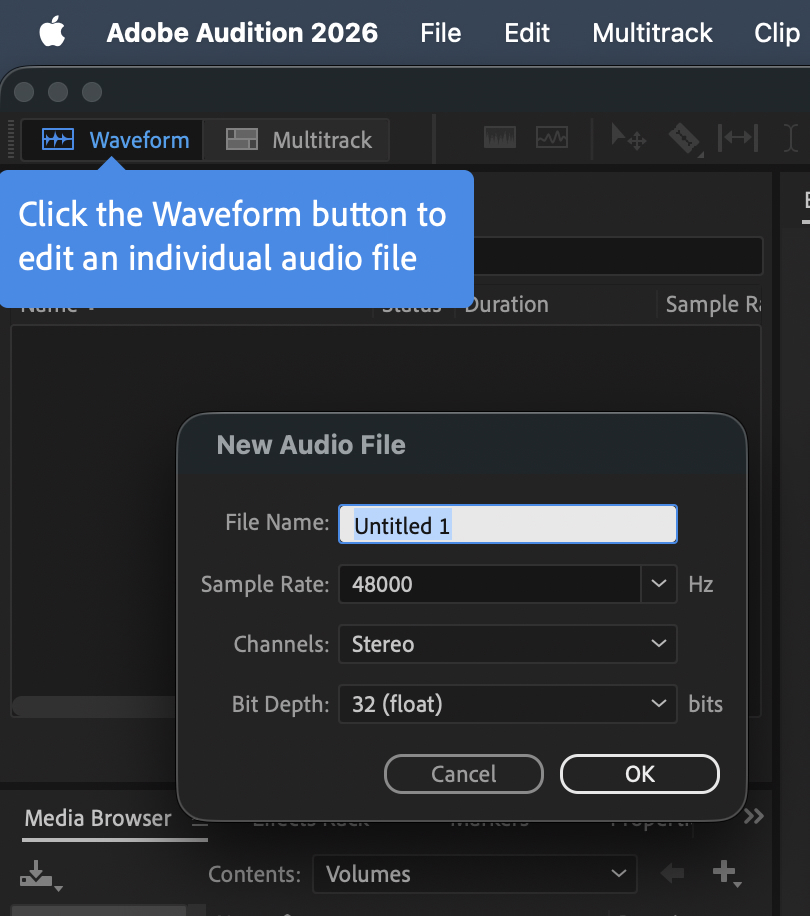
- Recording Your Own Voiceover (VO)
- In Waveform view > File > New > Audio File > arm Record (R). Then pull that clip to your multitrack.
-
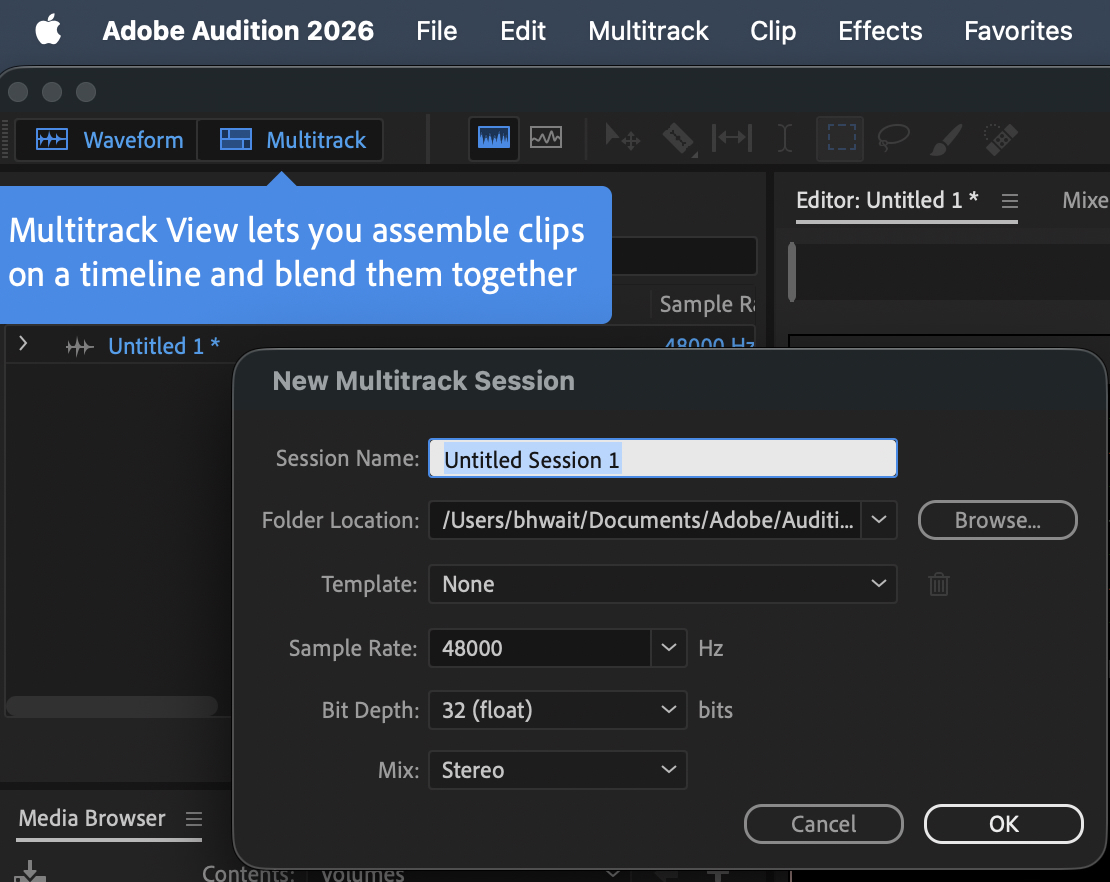
- Multitrack view is for layering multiple audio clips on a timeline (VO, music, SFX). Switch to this by selecting Multitrack in the upper left corner tool bar. *Select the folder location to be on your external drive, NOT on your computer. *Pro tip: Where the Multitrack session lives is where your audio files should also live.
-
-
- Create a “Multitrack Session” – File > Open a new multitrack session or select Multitrack button in the upper left corner.
- Session Name: Story Name (.sesx extension)
- Folder Location: Save this project in the ‘01 Project Files’ Folder (same folder with original media)
- Template: None (Other options: 24 track session, Podcast, Radio VO, Vocal, Film sequence stereo, DJ Drop etc.)
- Sample Rate: 44100 Hz – Explanation: 44,100 Hz (44.1 kHz) is the standard for general music production, while 48,000 Hz (48 kHz) is the industry standard for video, film, and broadcast.
- Bit Depth: 32 float – Explanation: Bit depth is the resolution Audition processes audio and creates mixdowns. 16-bit is basic quality, 24-bit is industry standard, and 32-bit Float offers the highest dynamic range and protection against clipping.
- Mix: Stereo – Explanation: Mono is for single-channel recordings where audio is centered. Stereo is the most common option for podcasts, music, and general broadcasting, allowing you to pan audio left and right across two channels. 5.1 Surround is used for immersive, multi-channel mixing for films, television, or specific surround-sound formats.
-
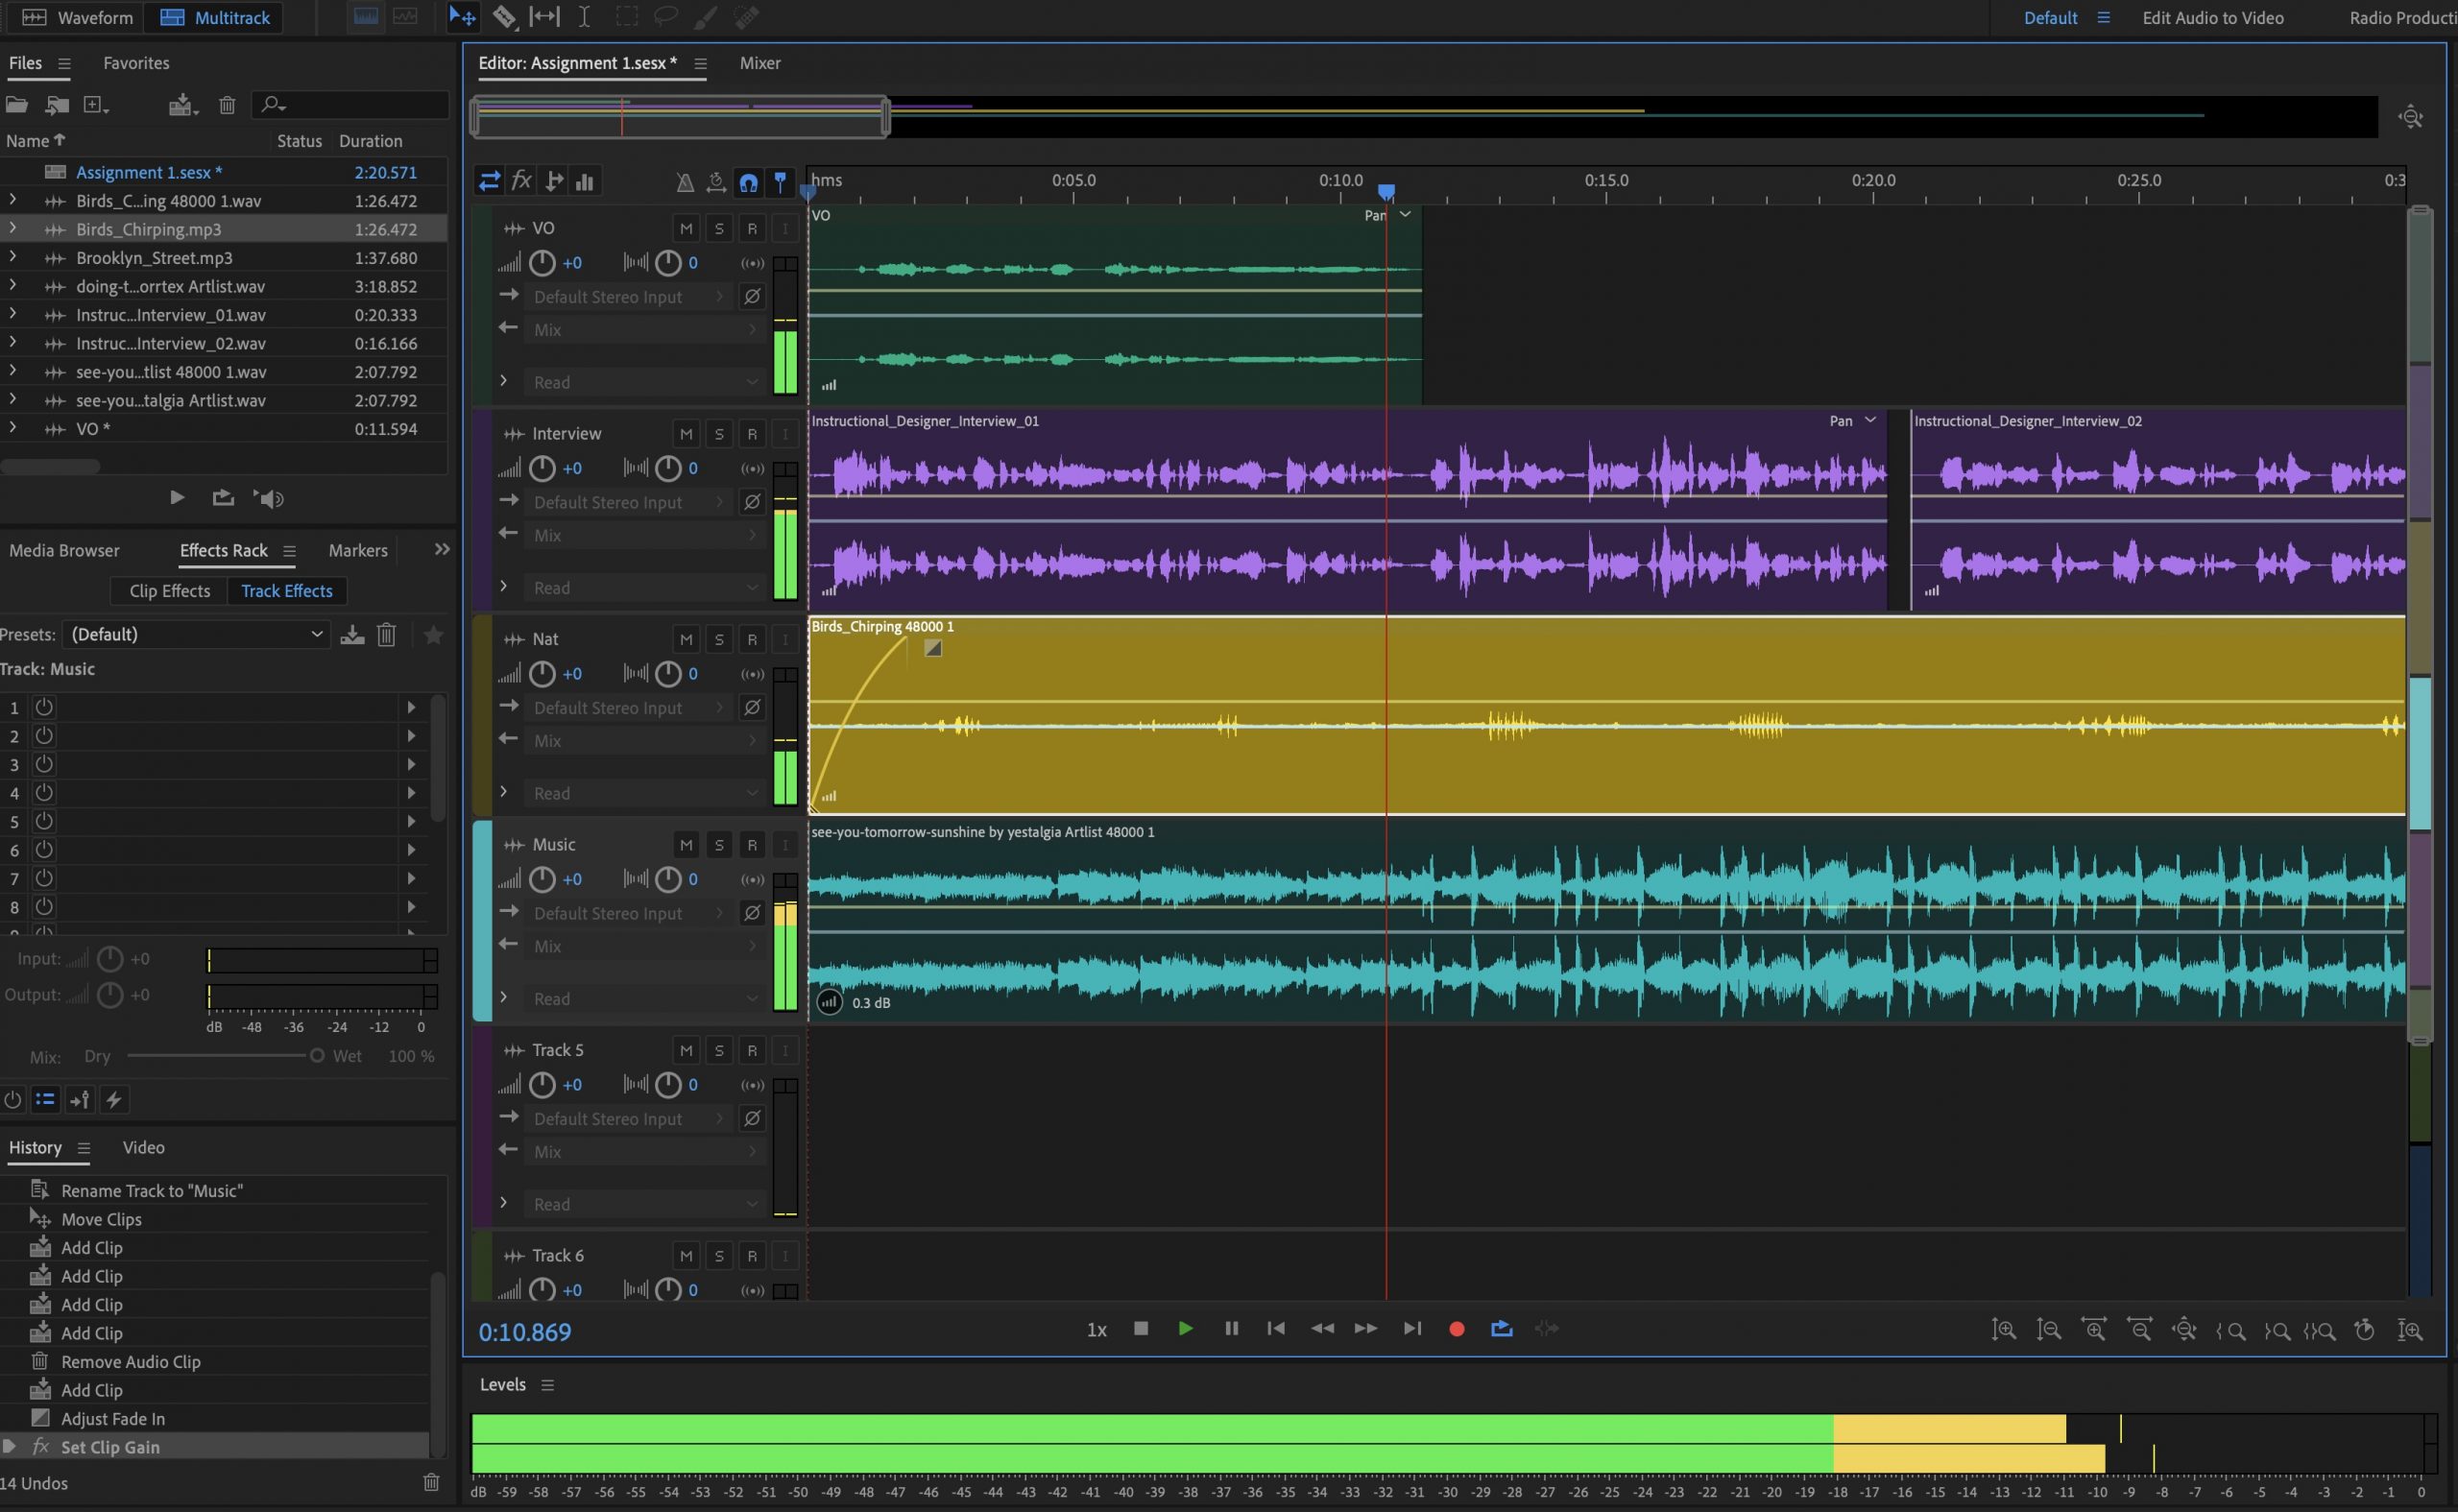
Know where your Audition Project is: Save vs. Save As
- File > Save overwrites the current .sesx session in place (Save often!)
- File > Save As creates a new session file — critical for creating multiple versions but keeping the original copy. (ie: “PSA_v1.sesx” vs “PSA_v2.sesx”)
Workspaces
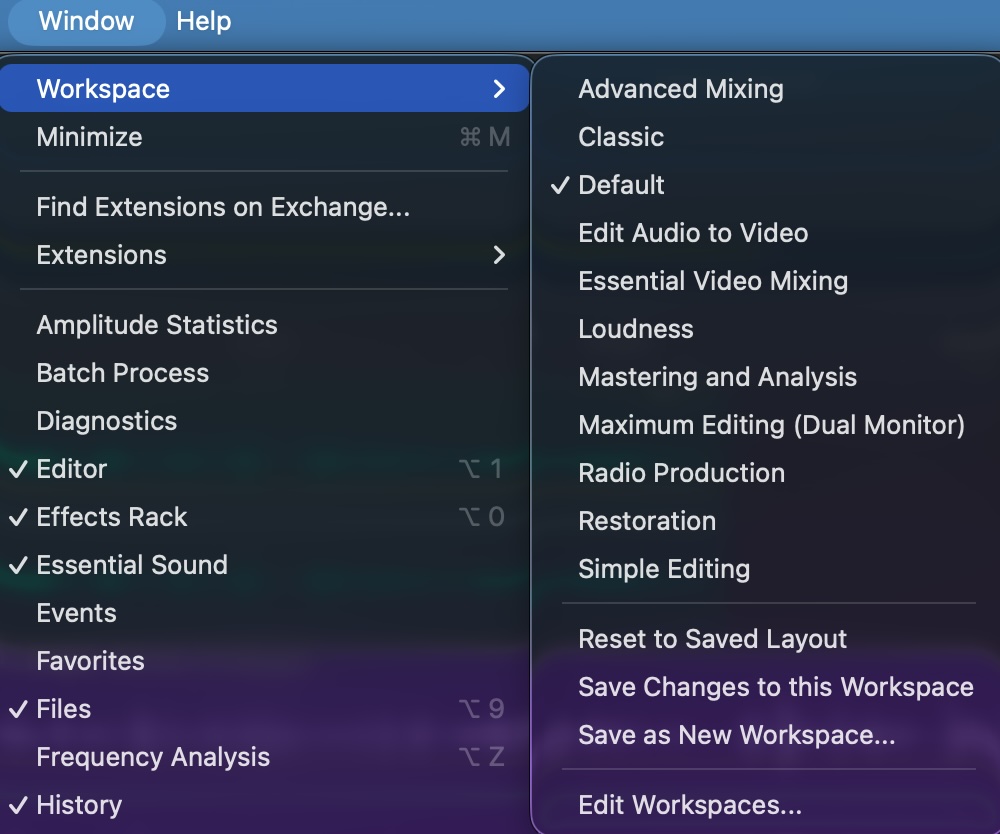
Navigate to Windows > Workspace > select ‘Simple Editing’
*Workspaces arrange panels and tools within Audition to assist in focusing on a certain aspect of the sound editing process. I tend to use default, but depending on what part of the sound editing process you’re in, you might want to explore your workspace options to fit your needs.
Import Media to Edit in Multitrack
- File > Import Media from the 01 ORIGINAL MEDIA folder.
- In Multitrack View, Organizing clips in Audio Tracks
- T1 = Scripted Voiceovers
- T2 = Interviews / SOTs
- T3 = Nat / Ambient / Sounds / Effects
- T4 = Music
Editing Tools in Multitrack Editor

- Move tool (V) – like the usual adobe selection tool is the default cursor to grab clips, moving them left/right on the timeline, or dragging them to entirely different tracks.
- Razor (R) – slices a clip into smaller, independent segments.
- Slip (Y) – Allows you to drag the underlying audio inside a clip’s boundaries without changing the clip’s position on the timeline
- Time Selection (T) – allows you to click and drag to highlight a specific section across one or multiple tracks to delete, copy, or apply effects to that exact time range.
- Marquee Selection Tool (E) – allows you to draw a rectangular box over tracks to freely select multiple clips and ranges simultaneously across different tracks.
- Lasso Selection (D) – draws free-form shapes to isolate specific audio data.
- Paintbrush (P) – is used for spectral editing in only the Waveform editor to paint over and select precise frequencies in a graphical representation of your audio.
- Spot Healing (B) – removes unwanted background sounds, clicks, and breaths.
More Shortcuts:

- (+) and (–) keys to zoom in and out of your multitrack session
- Fade in and out selecting the small gray box at the beginning and ends of clips
- Command / Control + A = Select All, Command / Control + Z = Undo
- Jump to beginning of selected clip: Ctrl + Left Arrow.
- Jump to end of selected clip / next edge: Ctrl + Right Arrow.
- Move to previous clip: Alt + Left Arrow (stops at every clip junction).
- Move to next clip: Alt + Right Arrow.
- Jump to beginning of timeline: Home.
- Jump to end of timeline: End.
Use the buttons below to zoom in and out of your multitrack editor to edit clips in more detail or to see the entire multi-clip edit in its entirety.

History Panel
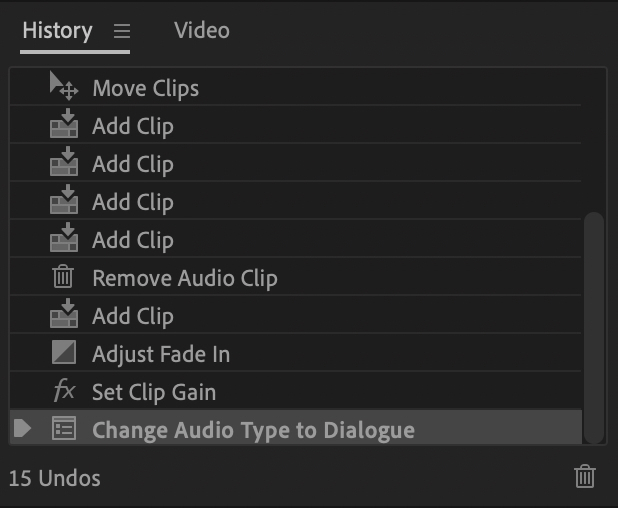
- You can go back to a previous edit and see your history of edits in this panel.
Sound Meter
- Keep an eye on the sound meter at the bottom of Audition’s interface to make sure your audio does not clip / peak distorting the sound of your final track.
- Pro tip: Keep dialogue to around -12db. DO NOT go beyond -6dB or your sound will become distorted and unusable. The meter will turn RED.

Mixer
- Use the mixer tab in Audition to make sure audio levels come in at appropriate levels within the multitrack editor.
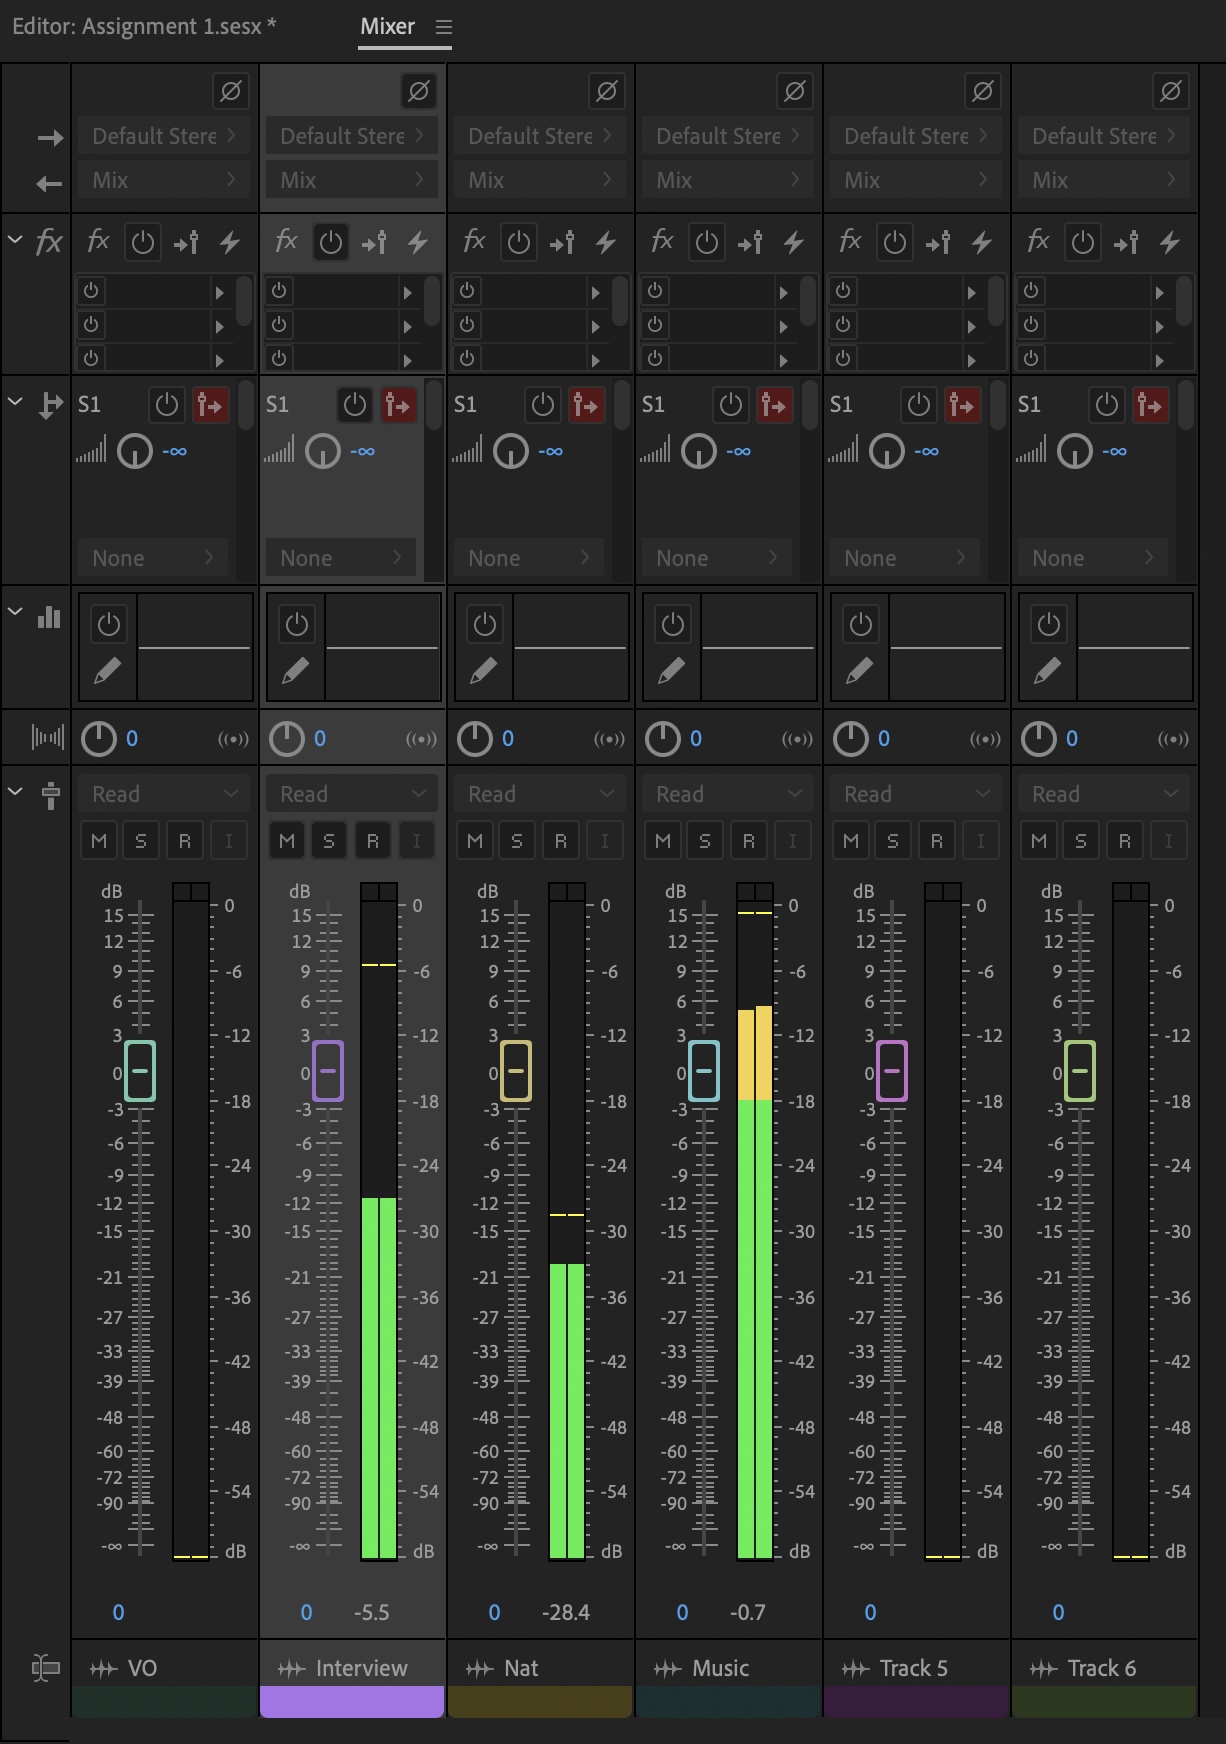
Applying Effects
Engage an effect over a track or single audio file (top menu > Effects)
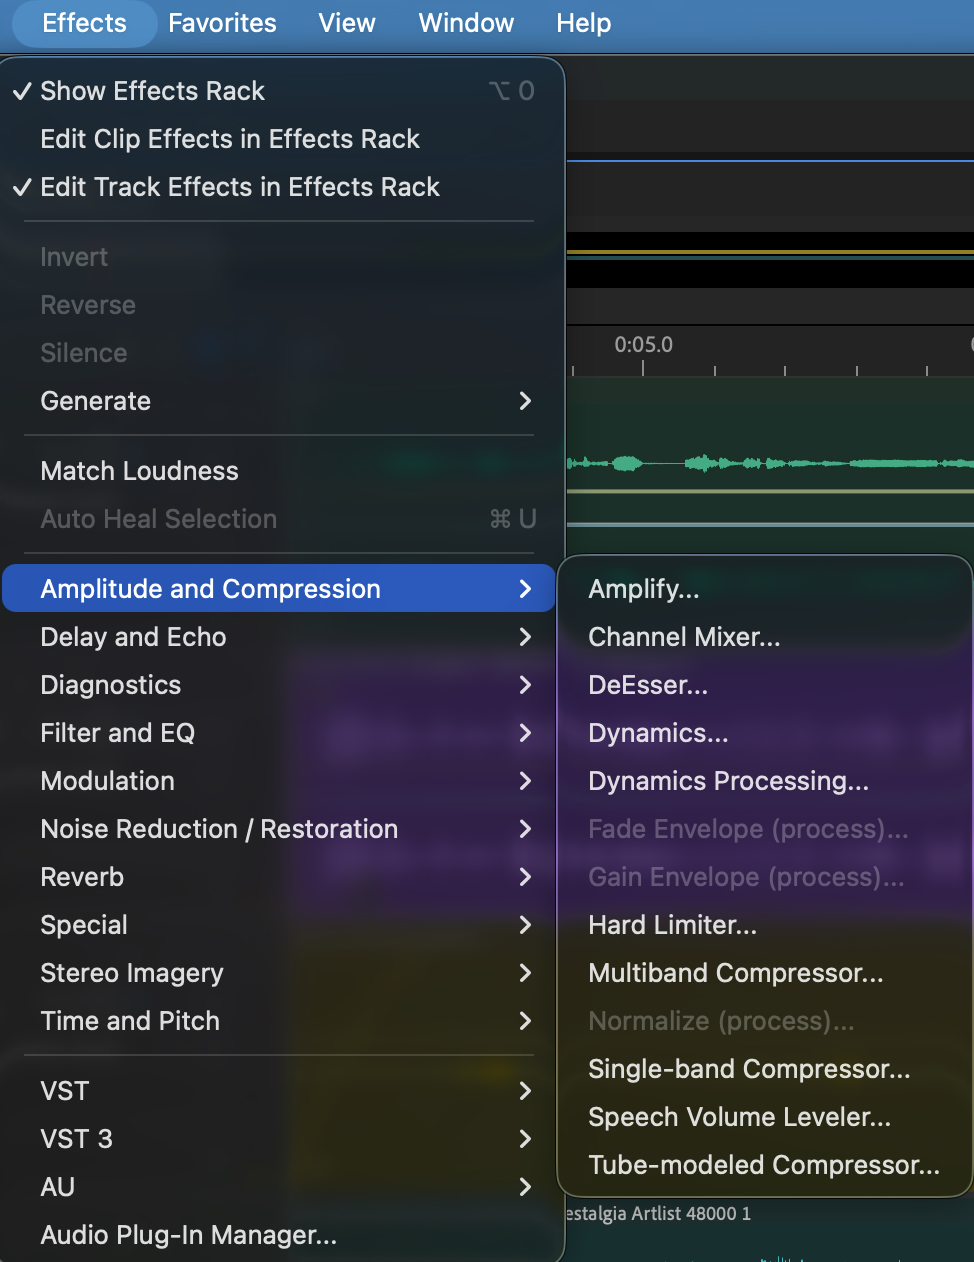
- DeNoise will help clean up dialogue, removing loud, distracting floor noise..
- Parametric EQ — carve low-end mud out of VO (~100-250Hz), add a touch of presence (~3-5kHz) – increases low or high end of voice. Narrows band‑pass filters to simulate the sound of a telephone call.
- Reverb — In a room, sound bounces off the walls, ceiling, and floor. All these reflected sounds reach your ears so closely together that you perceive them as sonic ambience creating an impression of space.
- Amplitude + Compression — evens out VO dynamics for louder & smoother sound.
- Limiter will create a safety net on the master track, so sounds don’t clip.
- Delay and Echo: Applies distortion + copies the same signal to echo.
- Noise Reduction: Fix the noise in audio using Spectral Display to visually identify and select ranges of noise or individual artifacts. Automatic Click Remover Effect: Fixes crackling sound from wireless mics. Adaptive Noise Reduction & DeHummer fix background noise like wind rumble, hiss, or electrical hum.
- DeClicker will remove high-pitched clicks in your audio.
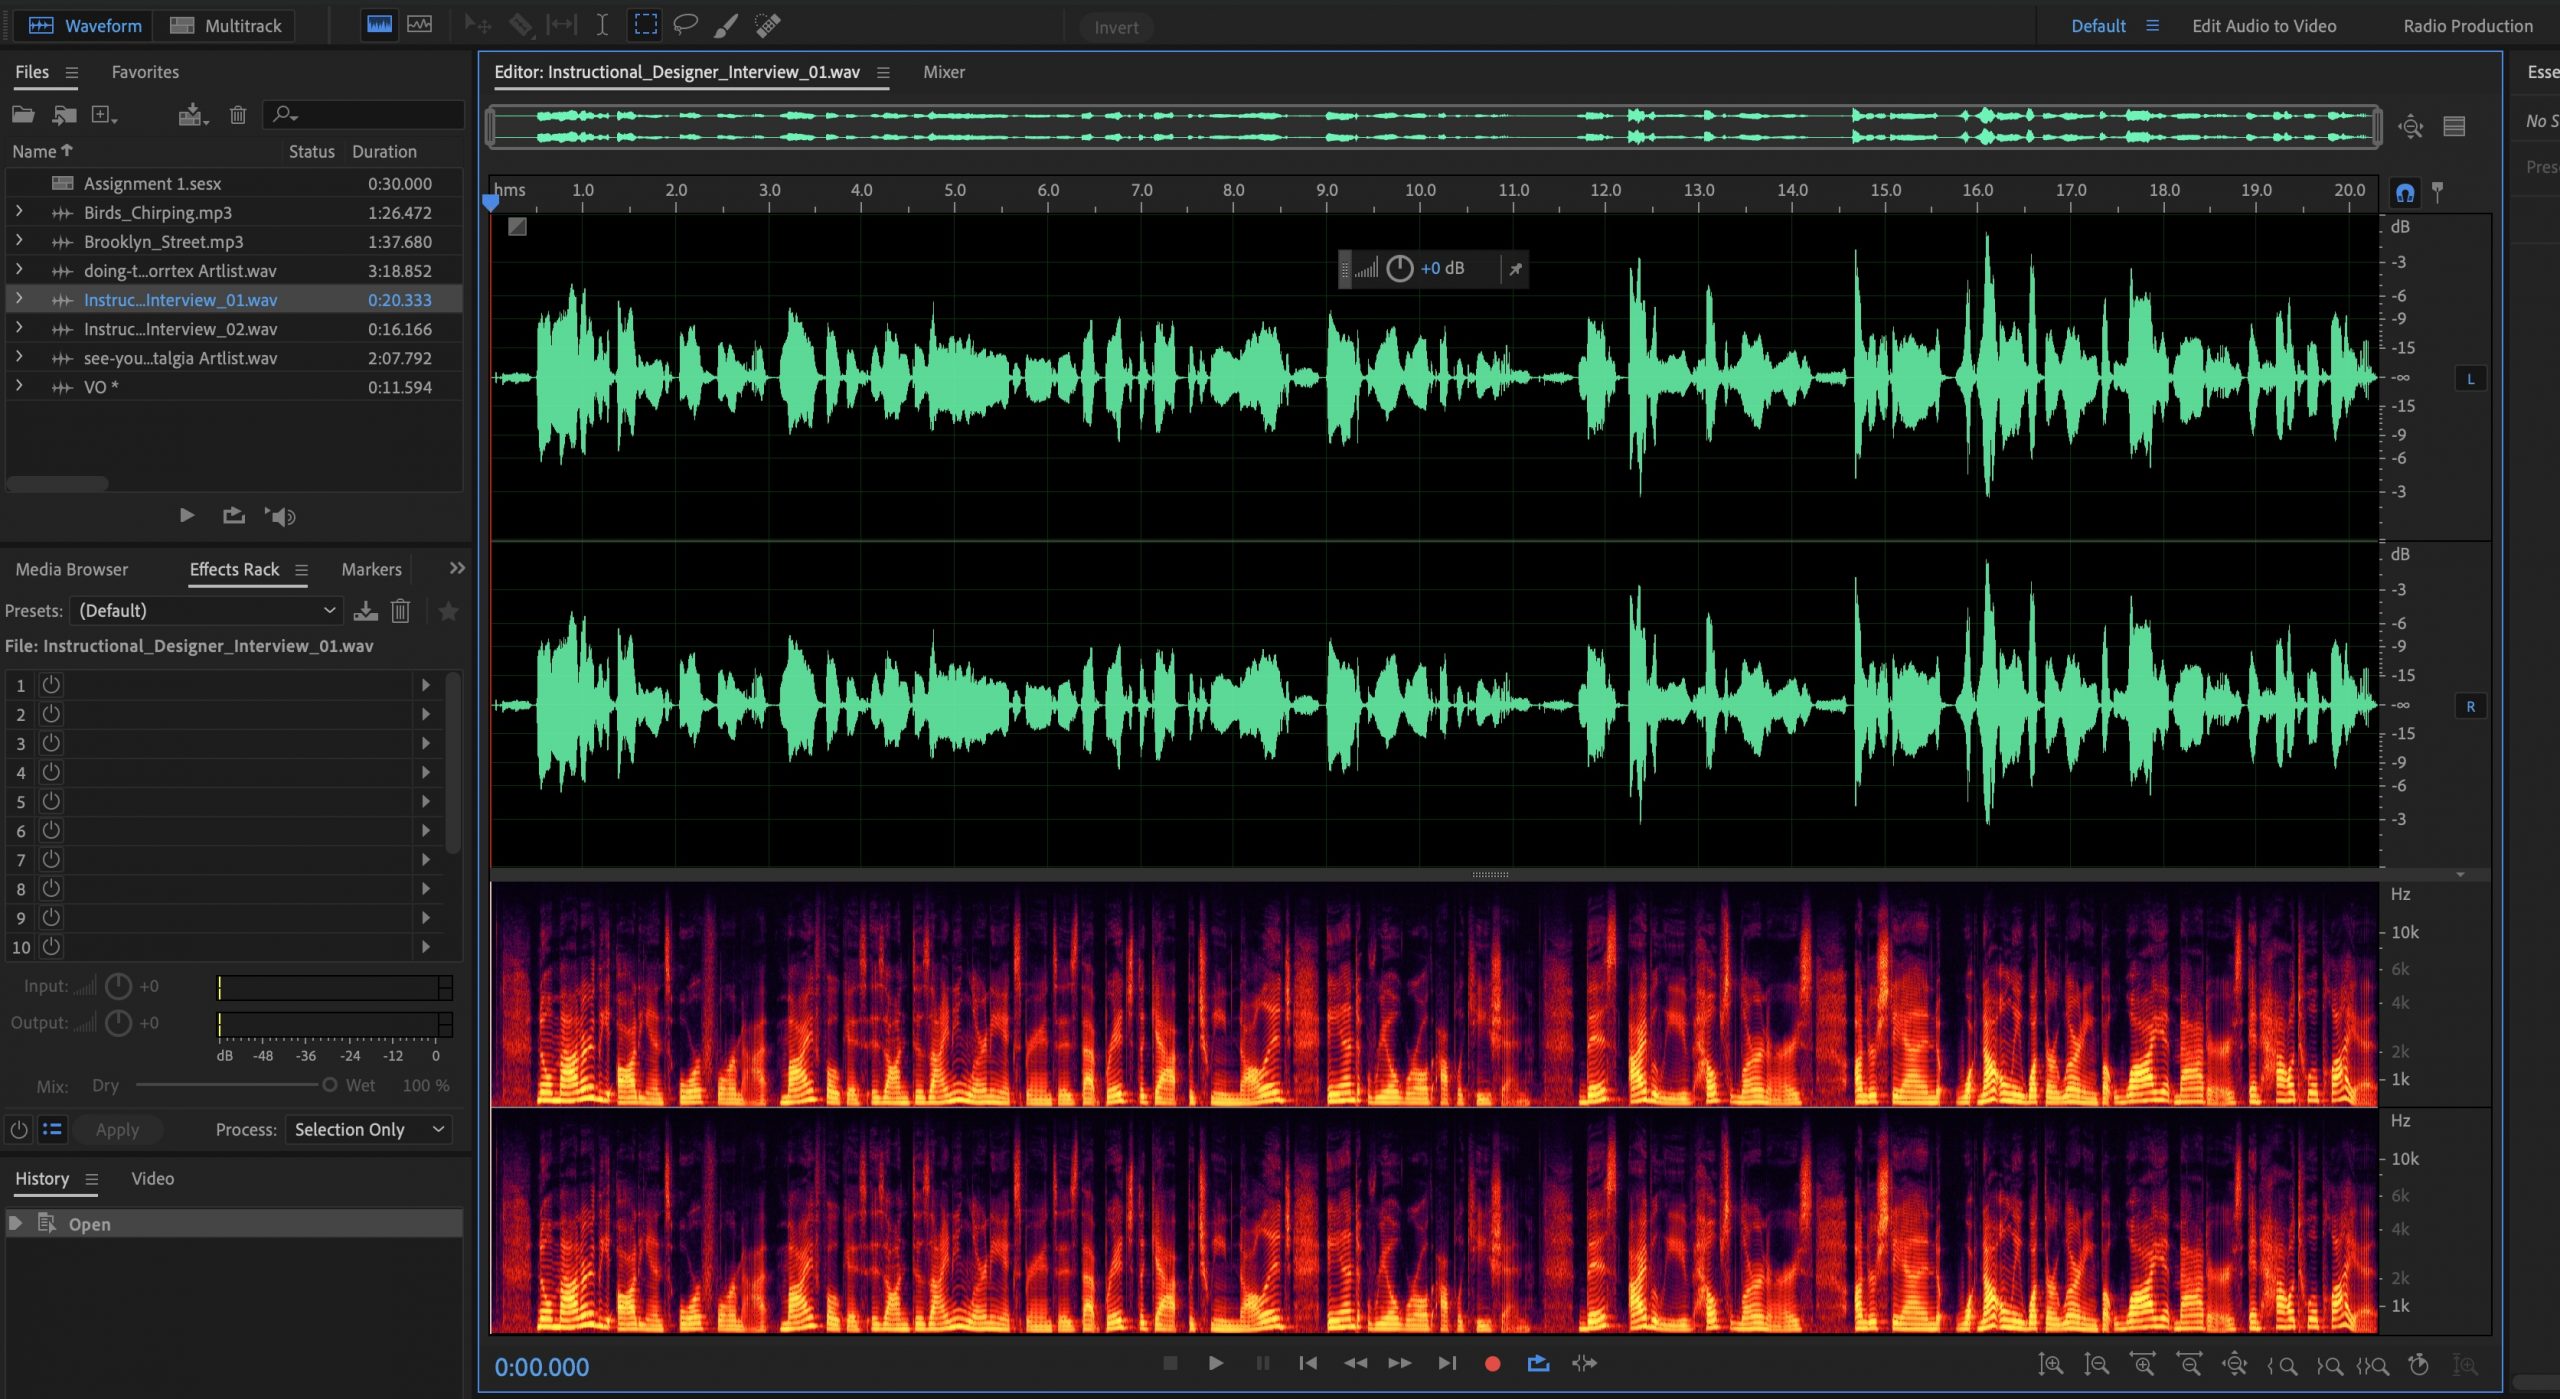
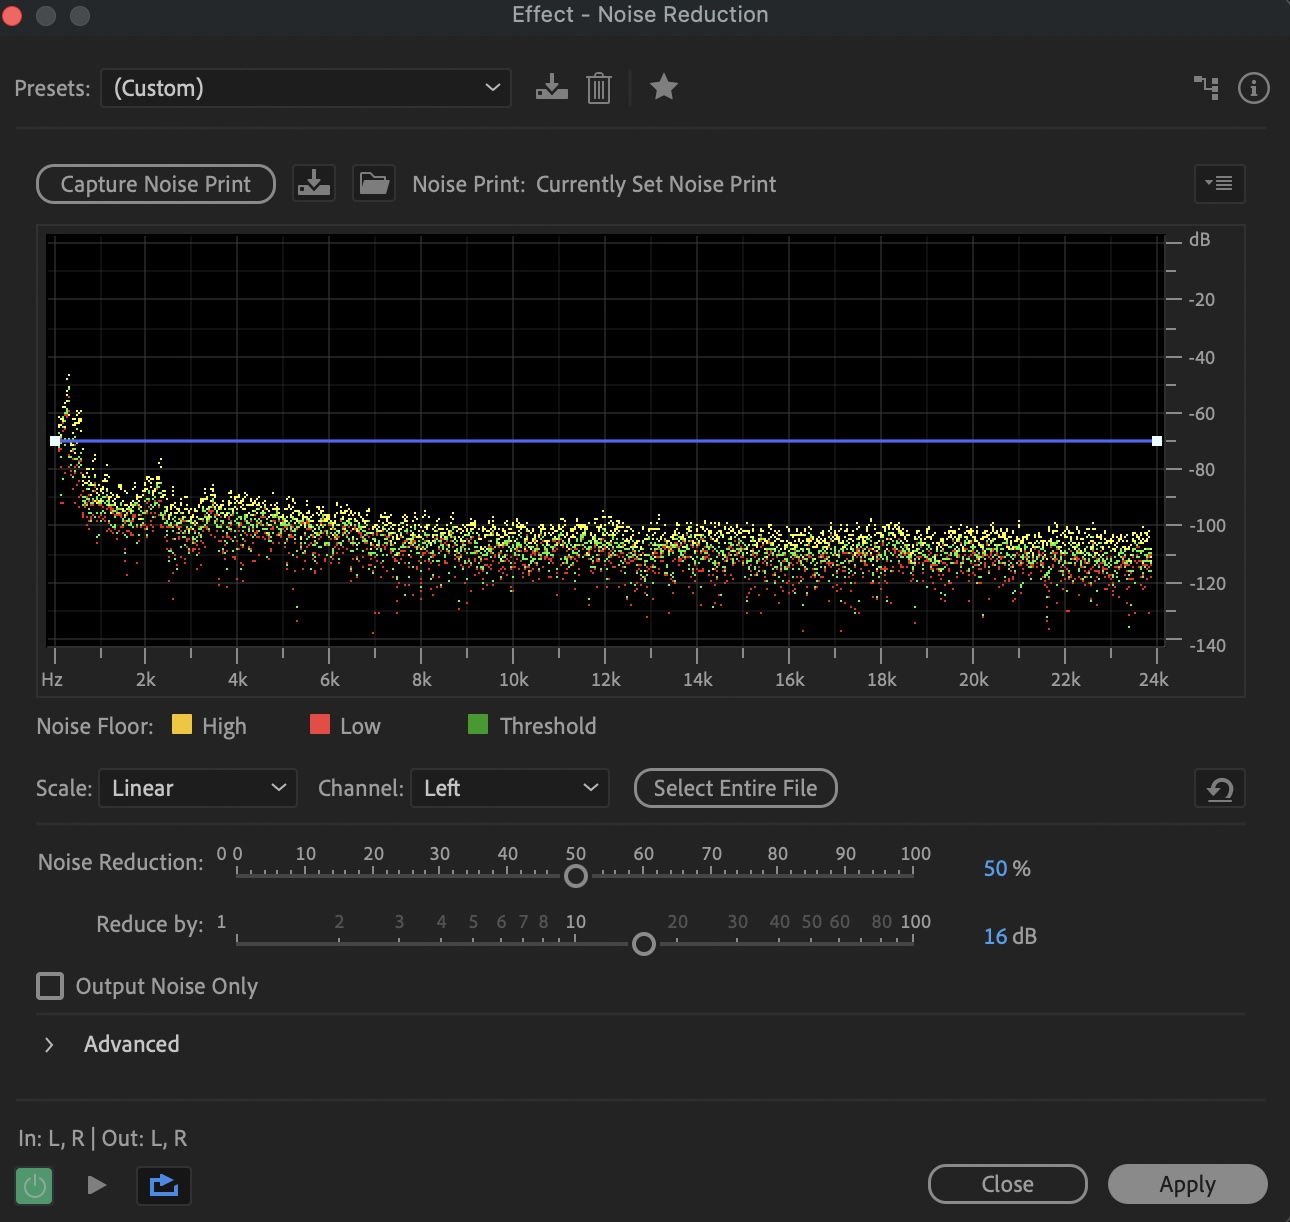
Here’s how to use the Noise Reduction Effect, which cleans up noise and reduces background sounds in recordings by first capturing a noise print.
- Import audio file in need of cleaning up into the Waveform Window
- Use Spectral Frequency Editor to identify noise. Waveform shows loudness over time. Spectral Frequency shows energy for each frequency over time. Louder sounds = brighter, lower sounds = darker.
3. Using the Time Selection tool (V), highlight a 1-to-2 second section containing only background noise, no dialogue.
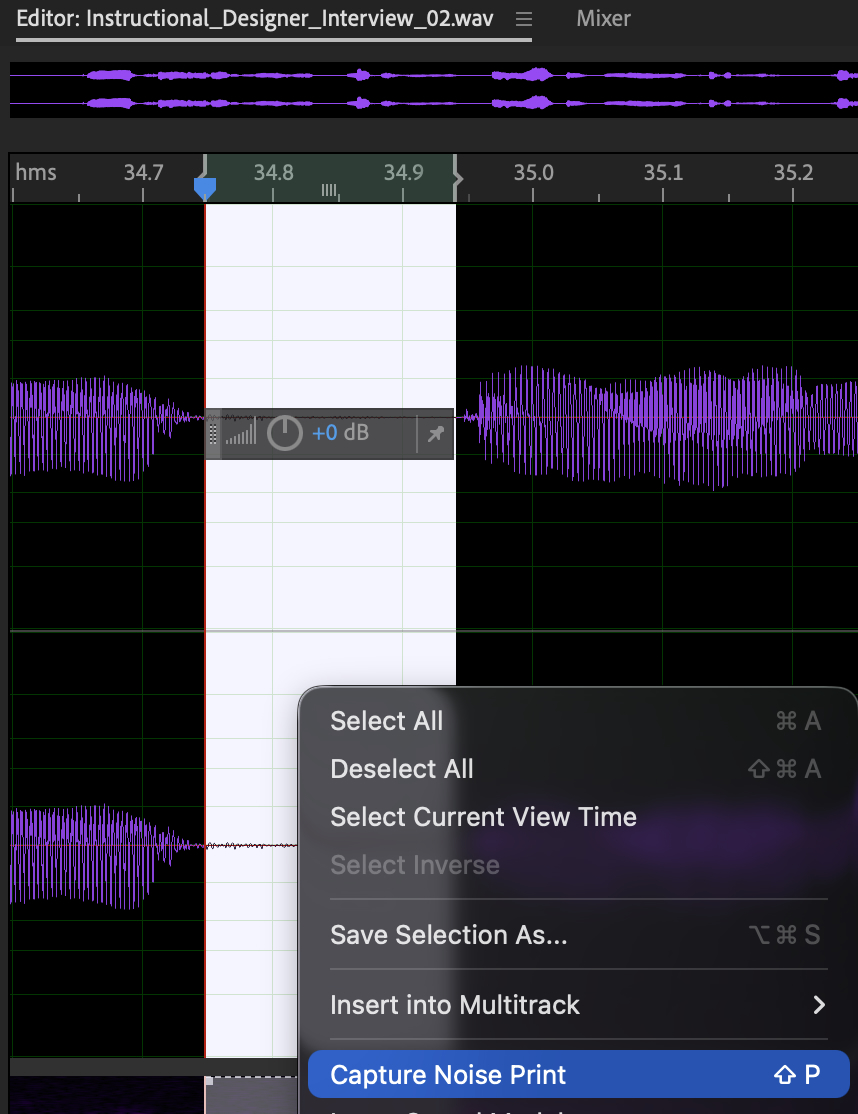
4. Go to Effects > Noise Reduction/Restoration > Capture Noise Print (or right-click your selection and choose it there).
5. Click anywhere on the waveform to clear the selection, then press Ctrl+A (Windows) or Cmd+A (Mac) to select your entire audio file.
6. Go to Effects > Noise Reduction/Restoration > Noise Reduction (process) and set the settings to a baseline – Noise Reduction: 50% and Reduce by: 10 to 15 dB.
7. Click ‘apply’
Essential Sound Panel
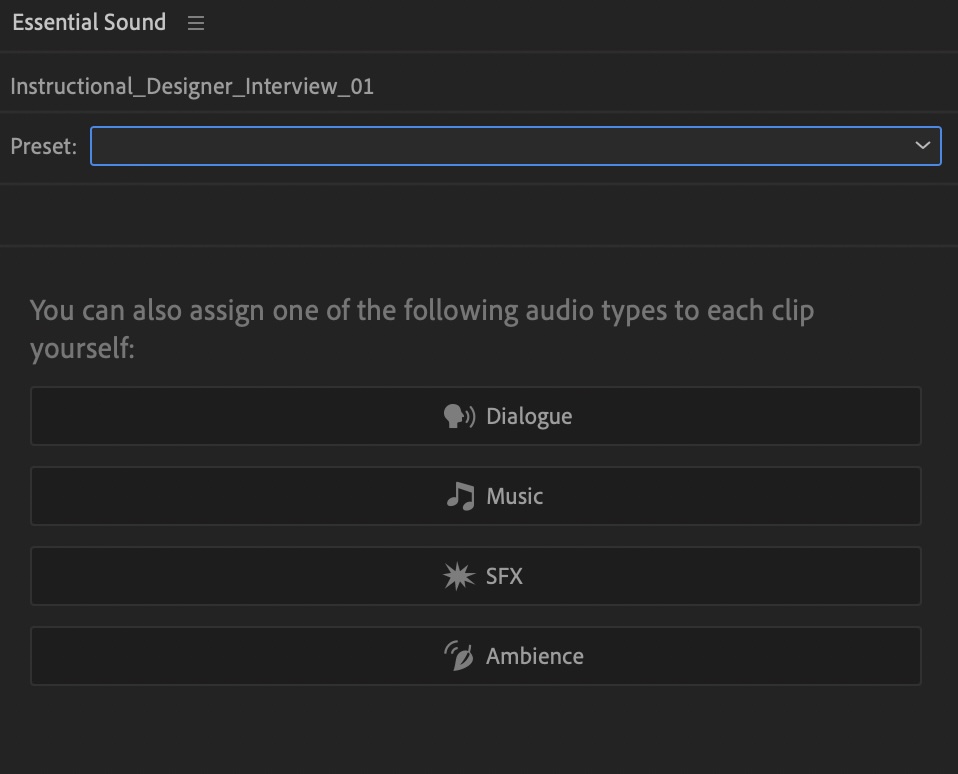
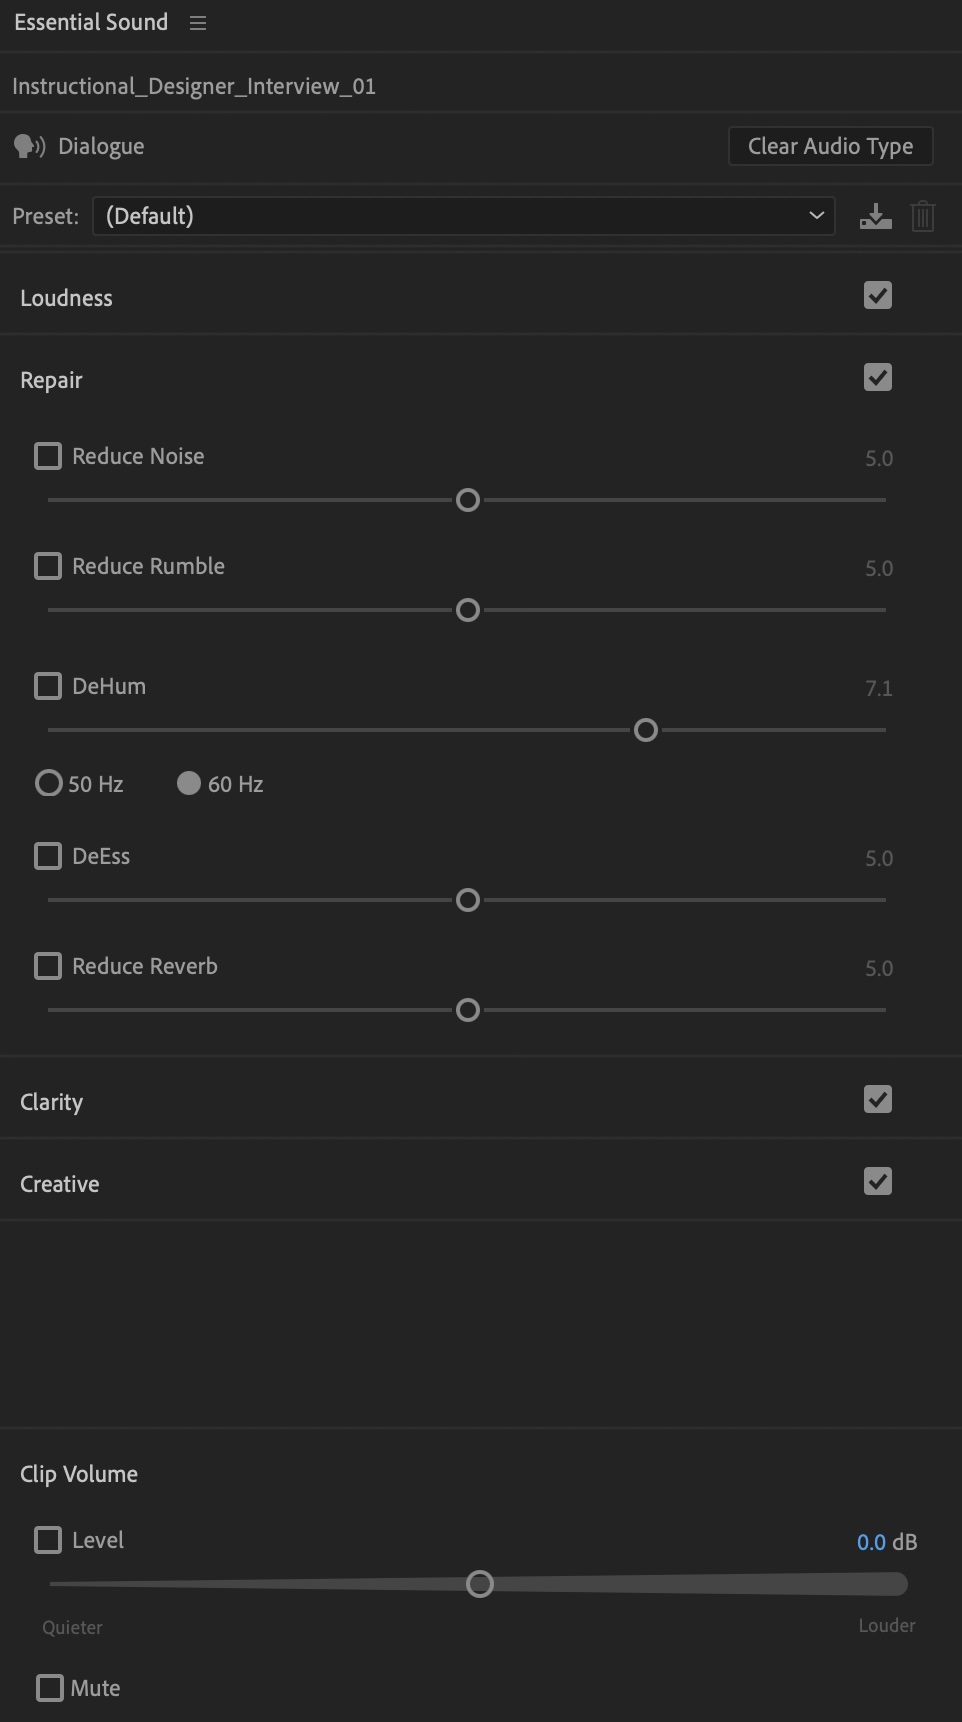
When mixing, the Essential Sound panel is a great resource for beginners to achieve results fast.
- Select a clip then assign it a Mix Type preset, such as Dialogue, Music, SFX or Ambience and adjust simple, ideal effects and settings to ensure great sound. You can adjust loudness to match other clips, so you get closer to even sound throughout, or reduce noise, rumble, deHum, deEss, reverb and improve clarity and make other creative decisions. Be careful not to over-process the audio clip and ruin the quality of the voice.
Export / Output your final mixdown / audio
- File > Export > Multitrack > Export > Multitrack Mixdown > Time Selection, Selected Clips or Entire Session.
- Check master fader isn’t clipping (watch for red in the meter)
- Sample rate should match project: (48kHz for video delivery)
- Export as WAV for archival or MP3 for quick sharing.
Exporting
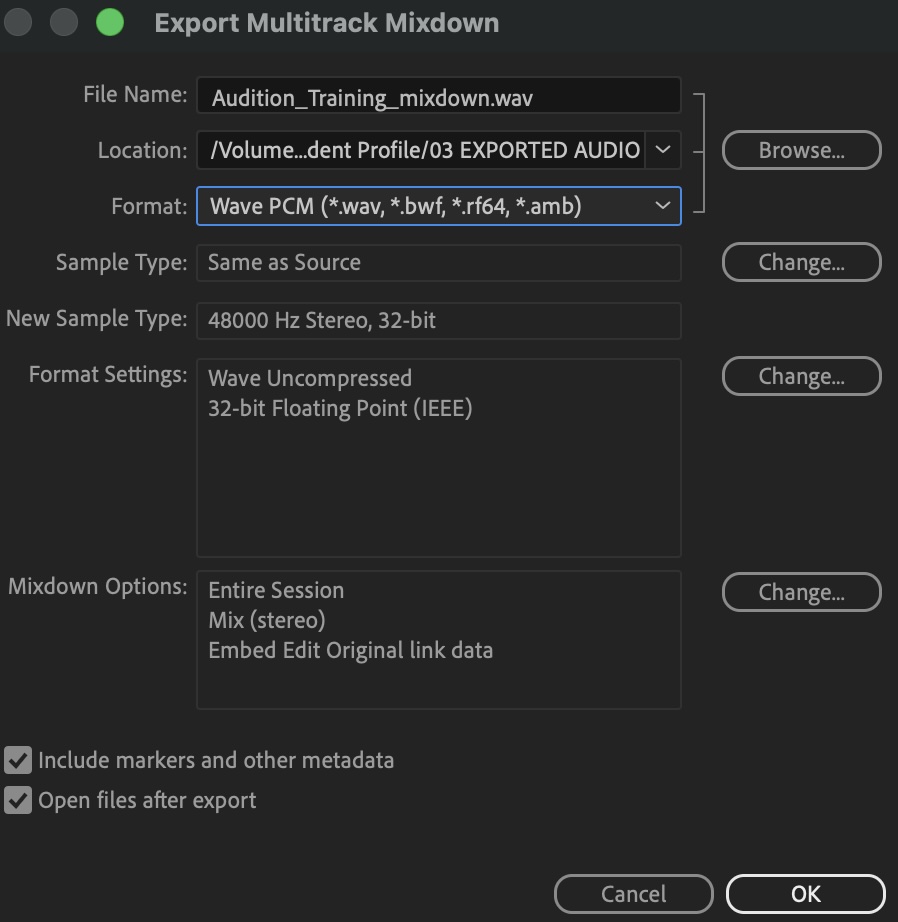
In the top menu, navigate to File > Multitrack Mixdown > Entire Session or Selected Clip
- Choose a file name
- Set the location you will store this final exported sound file [ie. EXPORT folder in external hard drive]
- Format: Mp3 or WAV PCM *Pick WAV if you intend to bring this back into Premiere to give you enough room for further editing
- WAV files store uncompressed, lossless audio, offering the highest audio quality for editing.
- MP3 files are compressed, smaller file sized audio clips, easy for sharing and streaming.
- Sample Type: Same as Source
- Stereo: To give depth and more sonic perspective, select a stereo master mix for the music and soundscape to surround the listener.
- Mono: Or to keep the sound in front of you and centered, export in Mono.
More Tips:
- Retain the speaker’s natural rhythm, subtle pauses to breathe, and overall quality of their voice. If it sounds robotic, if you’ve gone too far and have overprocessed.
- Don’t take out all breaths + pauses. You need that to give your listener breaks.
- Don’t leave jarring pops in your audio. Collecting Room tone is key. This is a 30 – 60 sec recording of the sound within a room before or after an interview. You can use this as a sound bed to cover pops in audio that happens when you cut up a large audio clip for multiple soundbites and leave dead sound between.
Royalty-Free Music Sourcing
Match tone to story by asking what the emotional arc is — hope, urgency, resolve? When searching for music, search by mood/instrumentation, not just genre.
- Artlist ($10/mo for music + sfx, more expensive to use ai), Epidemic Sound ($9/mo) — subscription, broadcast-safe, for publishing publicly
- Freesound.org — best for one-off SFX like the footsteps/door closing
Wrap-up / Q&A
Reach out if you want to set up a 1:1 session to go even deeper with training specialist Britt Spagnola, bhwait@syr.edu.